Let’s say you are about to launch your Google Ads campaign. You’ve nailed the keyword research, crafted amazing ad copies, and hit that launch button. Now you’re waiting to see the results roll in. But here is the thing, if you didn’t set up your conversions (or didn’t do it accurately) you won’t be able to understand how your campaigns are truly performing. At the end of the day, the most important outcome we want from ads is conversions (whether it’s sales, form submissions, calls, or something else).
In this guide, we’ll go step by step to help you set up conversions effortlessly. We’ll cover everything from setting them up manually (or letting Google lend a hand) to using Google Tag Manager – the easiest way to get it done. Plus, we’ll show you how to test your setup with Tag Assistant to make sure everything’s running smoothly.
And if you’re looking to fine-tune your campaigns for maximum results, a trusted Tampa PPC agency can provide the expert guidance you need.
Let’s dive in!
Step 1: Define Your Conversion Goals
The very first thing you should think of is deciding which actions you want to track as conversions. These could include:
- Form submissions (e.g., quote requests or contact forms).
- Phone calls (from mobile devices or your website).
- Purchases (for e-commerce businesses).
💡 Here are some examples to give you a better idea. A Tampa-based HVAC business might track form submissions for service requests and calls from their website’s “Contact Us” page. Similarly, an e-commerce store could focus on tracking completed purchases and even abandoned carts to optimize their sales funnel. For a real estate agency located in Florida, property inquiry forms and incoming phone calls would be key.
Step 2: Set Up Conversion Tracking in Google Ads
Once you’ve identified your goals, you can start creating a conversion action in Google Ads. Here’s how:
Option 1: Accept Google’s Suggestions
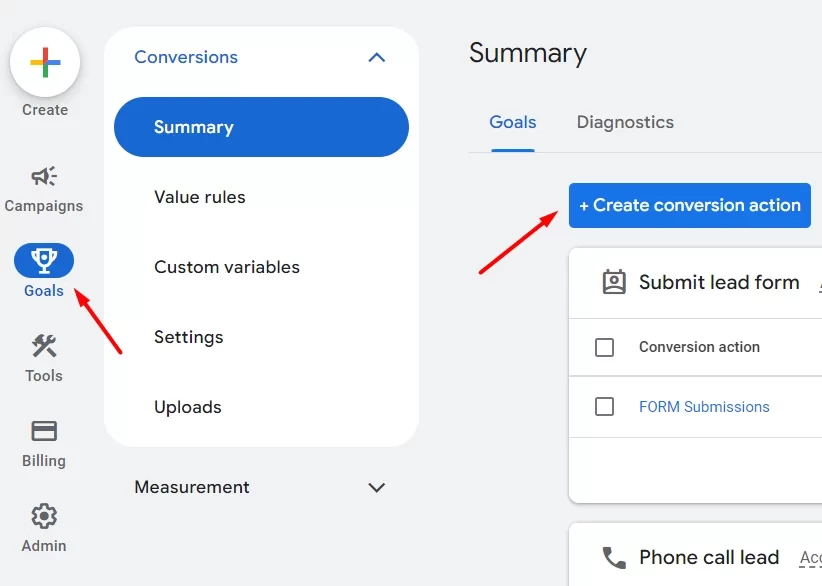
- Log in to Google Ads and go to Goals > Summary.
- Click the blue + Create Conversion Action.
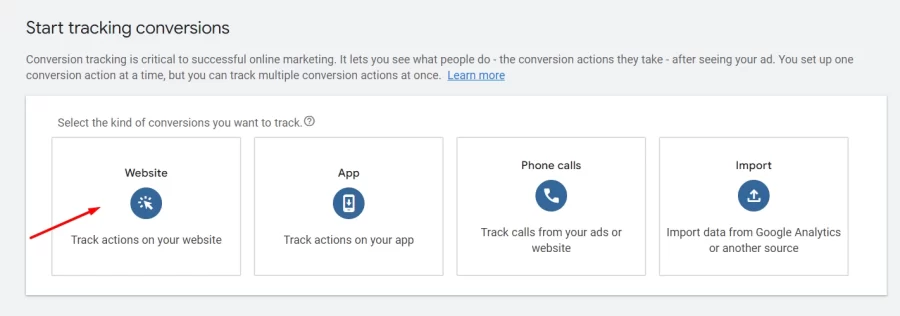
- Select the Website option.
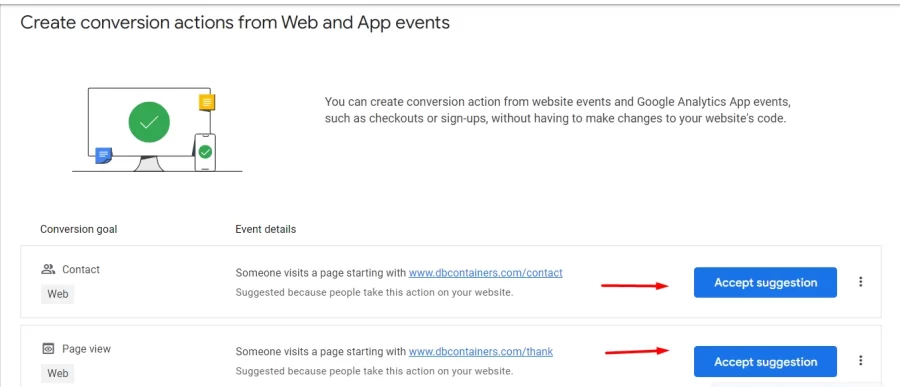
- Enter your website URL, and Google will scan it to suggest conversion actions.
- Review and accept the suggested actions (e.g., form submissions, button clicks, or purchases).
Option 2: Add Conversion Actions Manually
Choosing to manually set up conversions in Google Ads over accepting Google’s suggestions gives you complete control over what you’re tracking and how (and this is our preferred method).
With manual setup, you can:
- Tailor your tracking: Focus on specific actions that matter most to your business, like form submissions, unique product purchases, or downloads.
- Avoid unnecessary noise: Skip tracking irrelevant actions that Google might suggest, which could clutter your data.
- Fine-tune details: Assign custom values, choose attribution models, and set triggers based on your business strategy.
For example, a roofing company in Florida might prefer manually tracking only completed “Free Inspection” forms rather than all button clicks Google might suggest.
For manual setup, follow these steps:
- Choose + Create Conversion Action > Website.
- Enter your website URL and choose the specific conversion action manually (e.g., Submit a Form).

- Assign a value to the conversion (optional).
- Save the settings and continue to the next step.
Step 3: Setting Up Form Submission Conversions
Let’s dive into setting up a form submission conversion (one of the most important ones).
Define the Conversion:
Choose Submit Lead Form as your conversion action from “Category”.
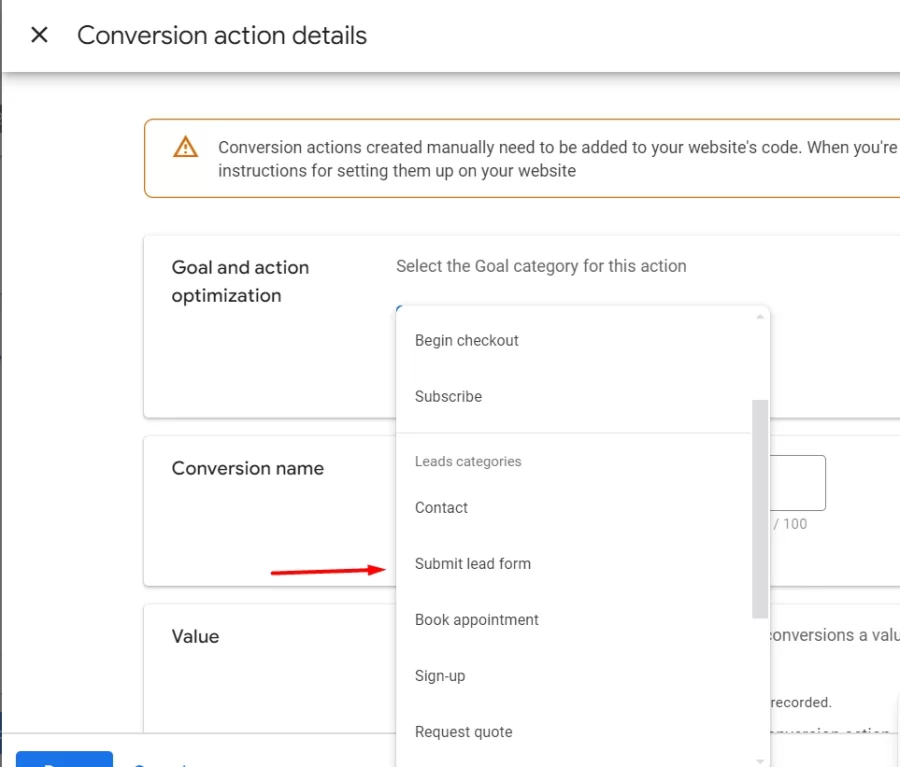
Name it (e.g., “Contact Form Submission”).
Value: Assign a specific dollar value or leave it as Don’t Use a Value.
- Same Value for Each Conversion: Use this if every lead has equal importance (e.g., $10 per form submission). We would recommend to use this one for this type of conversion action.
- Different Values for Each Conversion: Choose this if leads vary in worth, like a product inquiry vs. a service booking. Google will show you how to set this up dynamically, but it requires adding extra code to your website.
- No Value: This option skips assigning any value, but it’s not ideal since it limits insights into your campaign’s performance.
If unsure, start with a default value (e.g., $1) and adjust as needed!
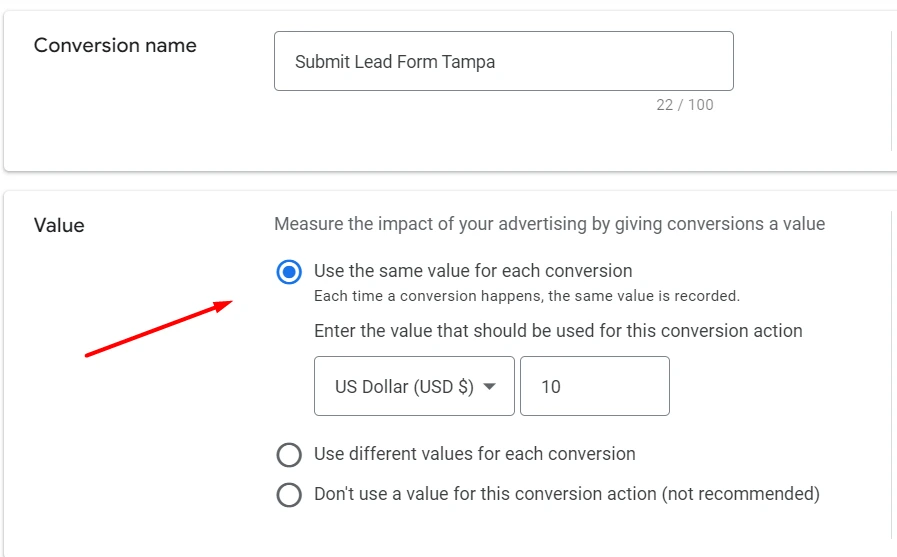
Count: Choose whether to count each conversion (for purchases) or only one (for leads).
Set the Conversion Window:
Default is 30 days; adjust based on your business needs.
Attribution Model:
Choose an attribution model (e.g., Last Click or Data-Driven). The recommended one is Data Driven.
Save Your Conversion:
Once you’ve completed the form, click Save and Continue.
Step 4: Adding the Conversion Tag Using Google Tag Manager
Google Tag Manager is the easiest way to implement your conversion tracking without directly editing your website’s code.
Here’s how:
Access Your Tag Manager Account:
Log in to Google Tag Manager and select your account.
Create a New Tag:
Click Tags > New.
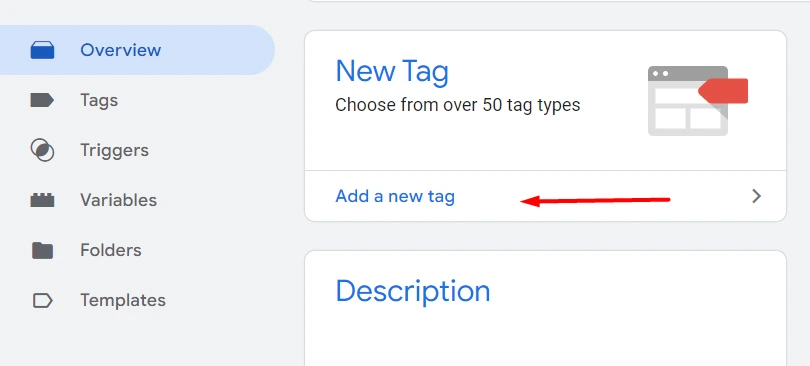
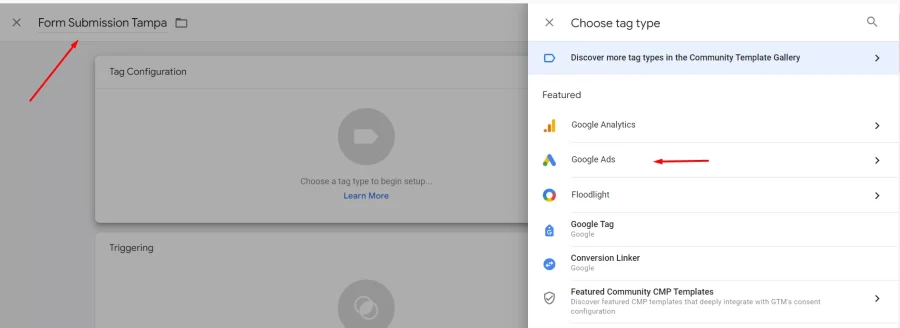
Name your tag (e.g., “Form Submission Conversion”).
Configure the Tag:
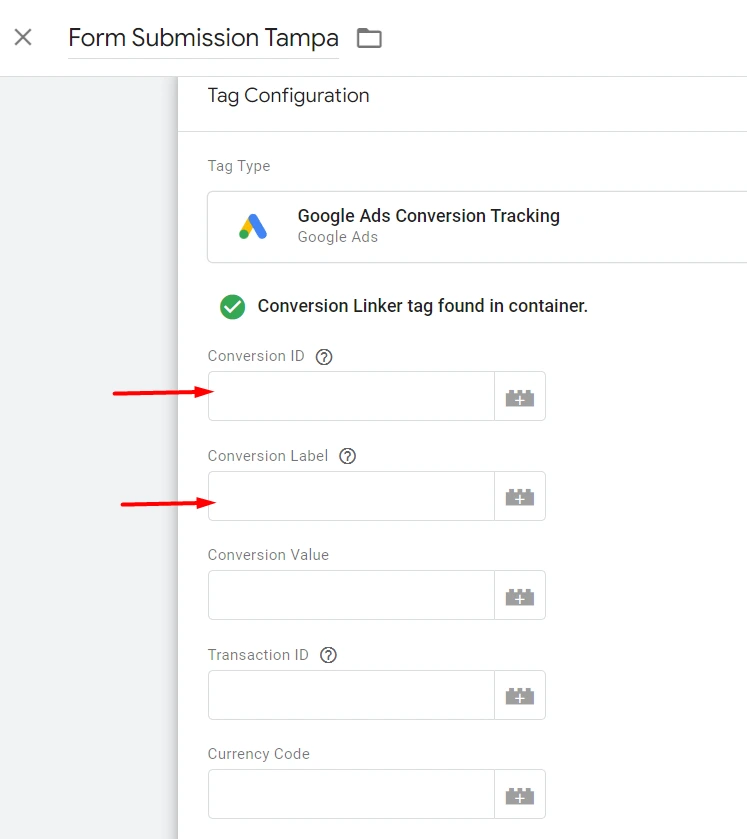
Choose Google Ads Conversion Tracking.
In your Google Ads account, after clicking Save while creating the conversion action, the next step will provide options for installing your tag. Select Tag Manager and copy the Conversion ID and Conversion Label.
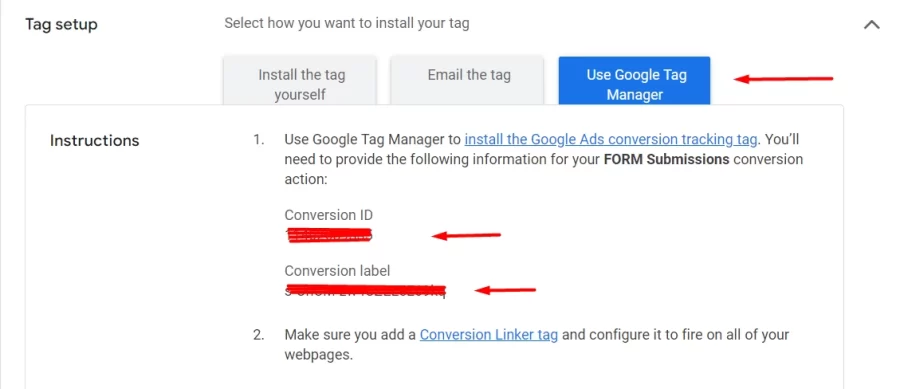
Enter the Conversion ID and Conversion Label provided by Google Ads in your Tag Configuration.
Set Up the Trigger:
Click Triggers > New.
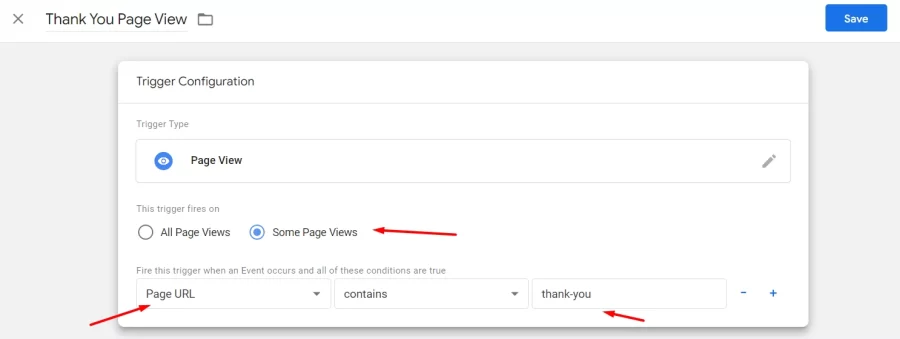
Choose a trigger type, such as Page View (e.g., a “Thank You” page users see after submitting a form).
Define the trigger conditions. The most common one for this kind of conversion action is – URL contains “thank-you”. Make sure to select Page URL instead of Click URL. Also, ensure that your website actually has a “thank-you” page before setting up this trigger.
Publish Your Tag:
Click Submit > Publish to make your changes live.
💡 Pro Tip: Using Google Tag Manager ensures that any future changes can be made without needing help from a developer.
Step 5: Adding Call Conversions
Tracking calls from your ads or website ensures you don’t miss critical leads.
Calls from Ads
This is the simplest setup.
Go to Goals > Conversions > Summary > Create Conversion Action
Choose Phone Calls > Calls from Ads.
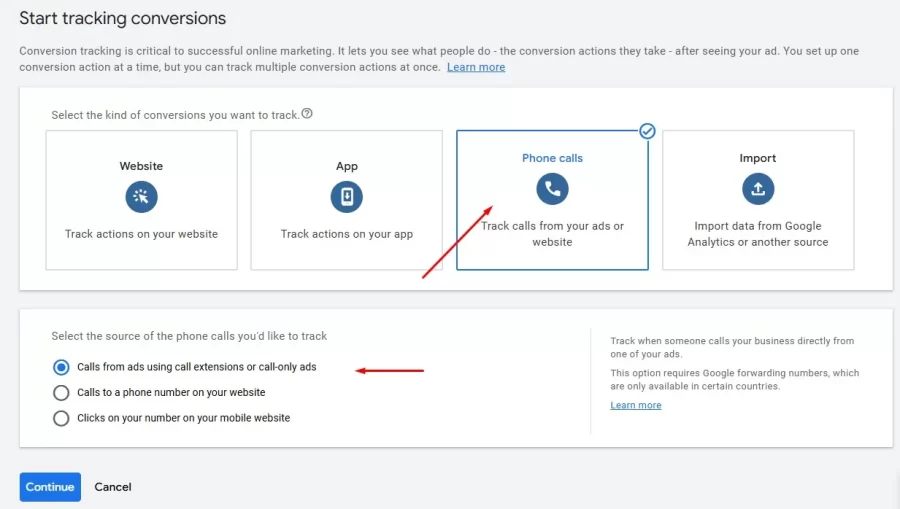
Name the conversion, assign a value (optional), and save.
Calls from Your Website
For website calls, you need to add an HTML snippet:
Go to Goals > Conversions > Summary and select Phone Calls > Calls to a Phone Number on Your Website.
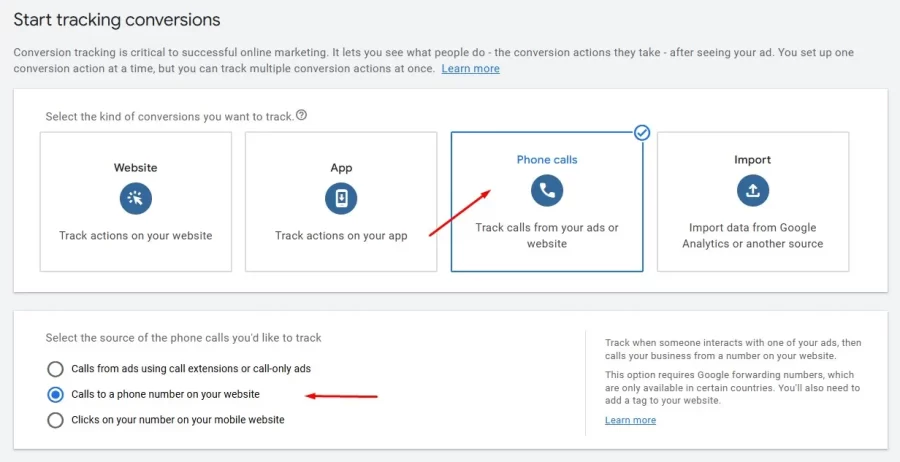
After adding the name, value, count, and phone number, click Next,and copy the HTML snippet Google provides.
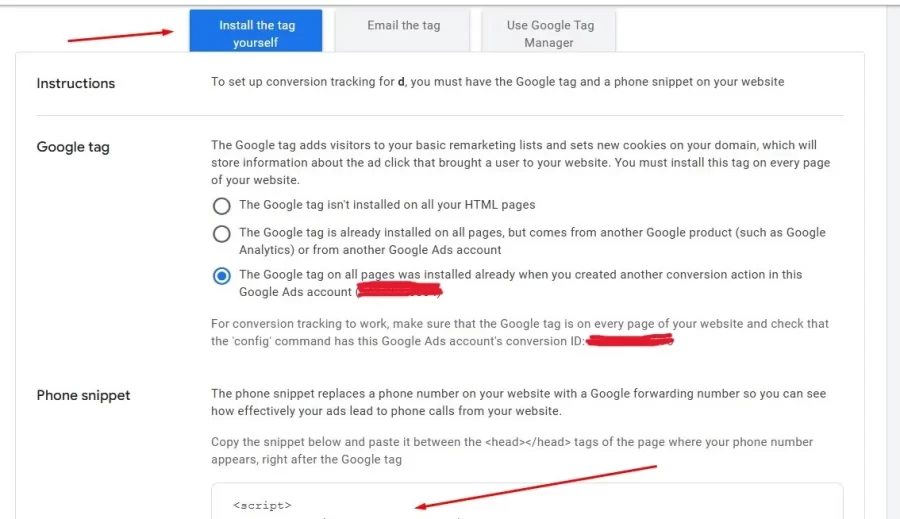
Add this snippet to your site using Google Tag Manager:
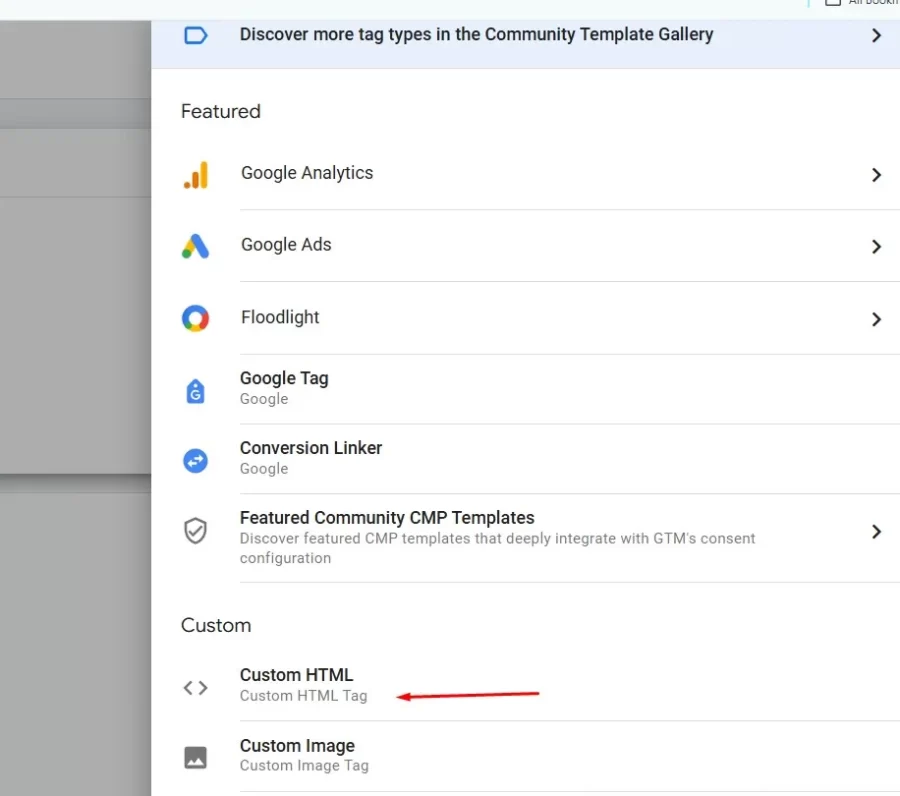
Create a new tag in Tag Manager.
Choose Custom HTML as the tag type.
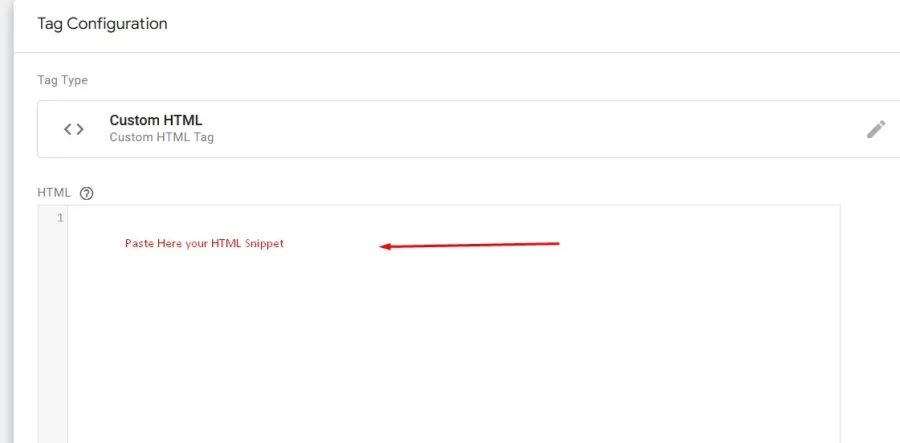
Paste the HTML snippet.
Set up a trigger for pages where the phone number appears (basically you can choose “All Pages”).
Publish the tag to activate tracking.
Step 6: Testing Your Conversion Setup with Tag Assistant
After setting up your conversions, it’s critical to test them to ensure they’re working correctly.
Install Tag Assistant:
Download the Google Tag Assistant extension for Chrome.
Enable Tag Assistant:
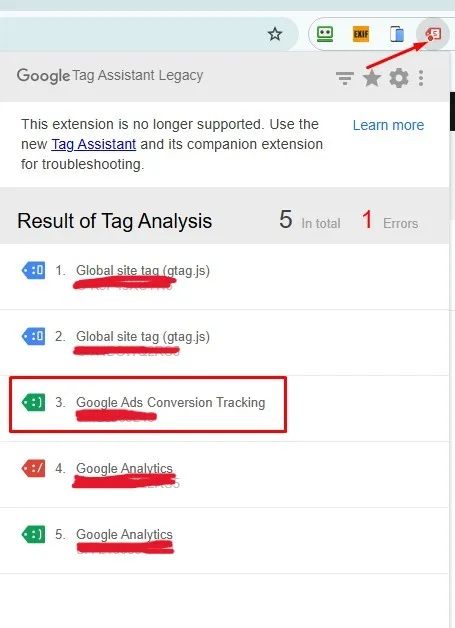
Navigate to your website and enable Tag Assistant.
Simulate Actions:
Perform the conversion actions you set up (e.g., submit a form, click the phone number, or view the “Thank You” page).
Verify Tags Are Firing:
Check the Tag Assistant report to ensure your Google Ads tags are firing correctly.
Look for the green “Google Ads Conversion Tracking” label, confirming the tag is active.
Review in Google Ads:
Log in to Google Ads and navigate to Goals > Conversions.
Verify that test conversions are being recorded.
💡 For example, an appliance repair company in Tampa might track online booking requests for repair services or calls made from their website’s “Schedule a Repair” page. Other businesses in Florida could track different actions, like a law firm monitoring consultation bookings, or a flower shop in Miami might track online orders for bouquets or inquiries submitted through their “Contact Us” form.
Setting up Google Ads conversions might feel tricky at first, but with tools like Google Tag Manager, it’s easier than you think! With accurate conversion tracking in place, you’ll gain the insights you need to optimize your campaigns, boost performance, and watch your business grow!
If you want expert guidance to fine-tune your campaigns, a trusted Tampa PPC agency can help you maximize results.


